
Tutorial install Moodle di Ubuntu 20.04 dengan web server Nginx versi Moodle 400 Stable. Alasan memilih Nginx karena lebih ringan dibanding Apache, serta konfigurasinya lebih sederhana. Software untuk menjalankan Moodle di Ubuntu 20.04 adalah sebagai berikut:
- Nginx
- MySQL/MariaDB
- PHP
Atau biasa disebut LEMP stack.
Direktori penyimpanan web Moodle akan disimpan di /var/www/html/moodle
Sebagai permulaan, mari update system Linux
apt update -yLangkah 1 – Install Nginx
Install Nginx versi stable
apt install nginx -yStart Nginx
systemctl start nginxOtomatis aktifkan Nginx jika server direstart
systemctl enable nginxLangkah 2 – Install MariaDB
Install MariaDB terbaru 10.5, tambah dulu repositorynya
apt-get install software-properties-common
apt-key adv --fetch-keys 'https://mariadb.org/mariadb_release_signing_key.asc'
add-apt-repository 'deb [arch=amd64,arm64,ppc64el] http://sgp1.mirrors.digitalocean.com/mariadb/repo/10.5/ubuntu focal main'
Update, start, enable saat reboot dan atur password root
apt update -y
systemctl start mariadb-server
systemctl enable mariadb
mysql_secure_installation
Sesuaikan
NOTE: RUNNING ALL PARTS OF THIS SCRIPT IS RECOMMENDED FOR ALL MariaDB
SERVERS IN PRODUCTION USE! PLEASE READ EACH STEP CAREFULLY!

In order to log into MariaDB to secure it, we'll need the current
password for the root user. If you've just installed MariaDB, and
haven't set the root password yet, you should just press enter here.

Enter current password for root (enter for none):
OK, successfully used password, moving on...

Setting the root password or using the unix_socket ensures that nobody
can log into the MariaDB root user without the proper authorisation.

You already have your root account protected, so you can safely answer 'n'.

Switch to unix_socket authentication [Y/n] Y
Enabled successfully!
Reloading privilege tables..
... Success!


You already have your root account protected, so you can safely answer 'n'.

Change the root password? [Y/n] Y
New password: Ketik password
Re-enter new password: Ulangi ketik password
Password updated successfully!
Reloading privilege tables..
... Success!


By default, a MariaDB installation has an anonymous user, allowing anyone
to log into MariaDB without having to have a user account created for
them. This is intended only for testing, and to make the installation
go a bit smoother. You should remove them before moving into a
production environment.

Remove anonymous users? [Y/n] Y
... Success!

Normally, root should only be allowed to connect from 'localhost'. This
ensures that someone cannot guess at the root password from the network.

Disallow root login remotely? [Y/n] Y
... Success!

By default, MariaDB comes with a database named 'test' that anyone can
access. This is also intended only for testing, and should be removed
before moving into a production environment.

Remove test database and access to it? [Y/n] Y
- Dropping test database...
... Success!
- Removing privileges on test database...
... Success!

Reloading the privilege tables will ensure that all changes made so far
will take effect immediately.

Reload privilege tables now? [Y/n] Y
... Success!

Cleaning up...

All done! If you've completed all of the above steps, your MariaDB
installation should now be secure.

Thanks for using MariaDB!
Langkah 3 – Install PHP
Install versi PHP 7.4 terbaru
apt install php-phpdbg php-fpm php-curl php-gd php-imap php-interbase php-intl php-ldap php-readline php-pspell php-tidy php-xmlrpc php-json php-sybase php-mysql php-opcache php-bz2 php-mbstring php-xml php-enchant php-gmp php-soap php-zip php-bcmath php-pdo -yStart dan aktifkan saat boot
systemctl start php-fpm
systemctl enable php-fpm
Atur konfigurasi PHP
nano /etc/php/7.4/fpm/php.iniCari baris-baris berikut dan sesuaikan
date.timezone = "Asia/Jakarta"
post_max_size = 64M
upload_max_filesize = 64M
memory_limit = 512M
max_input_vars = 10000
Restart php-fpm
systemctl restart php7.4-fpmLangkah 4 – Membuat virtual host Moodle
Simpan semua virtual host di /etc/nginx/sites-available/ agar kelak mudah mengelolanya.
nano /etc/nginx/sites-available/moodle.idnetter.com.confIsi dengan kode di bawah ini, untuk domain idnetter.com hanya contoh, jadi silahkan diadaptasikan.
Jika tidak ada domain, silahkan hapus baris idnetter.comdan dan www.idnetter.com ganti dengan _ (underscore)
server {
	listen	*:80;
	server_name	idnetter.com www.idnetter.com;
	root	/var/www/html/moodle;
	index	index.php index.html index.htm;

	rewrite ^/(.*\.php)(/)(.*)$ /$1?file=/$3 last;

	location / {
		try_files $uri $uri/ /index.php?$args;

		if (!-e $request_filename) {
			rewrite ^(.+)$ /index.php?q=$1 last;
		}

		location ~ [^/]\.php(/|$) {
			fastcgi_param SCRIPT_FILENAME $document_root$fastcgi_script_name;
			if (!-f $document_root$fastcgi_script_name) {
				return  404;
			}

			fastcgi_pass	unix:/var/run/php/php7.4-fpm.sock;
			fastcgi_intercept_errors on;
			fastcgi_hide_header X-Powered-By;
			fastcgi_index   index.php;
			include		 /etc/nginx/fastcgi_params;
		}

	}

	location = /favicon.ico {
		log_not_found off;
		access_log off;
	}

	location = /robots.txt {
		allow all;
		log_not_found off;
		access_log off;
	}

    location ~ ^/(\.user.ini|\.htaccess|\.git|\.svn|\.project|LICENSE|README.md|\.htpasswd) {
        deny	all;
		return 404;
    }

    location ~ .*\.(gif|jpg|jpeg|png|bmp|swf|webp|ico|svg|eot|otf|woff|woff2|ttf|ogg)$
    {
        expires      30d;
        error_log off;
        access_log /dev/null;
    }

    location ~ .*\.(js|css)?$
    {
        expires      12h;
        error_log off;
        access_log /dev/null;
    }
}
Konfigurasi virtualhost ini nanti akan dibuat symbolic link ke /etc/nginx/sites-enabled/, yaitu direktori untuk menyimpan virtualhost aktif yang diload oleh Nginx.
Tujuannya, jika suatu saat kita ingin men-ON-OFF-kan web yang dihostkan di server menjadi lebih mudah, yaitu dengan unlink konfigurasi virtualhost tersebut.
Sekarang buat symbolic link ke sites-enabled
ln -s /etc/nginx/sites-available/moodle.idnetter.com.conf /etc/nginx/sites-enabled/moodle.idnetter.com.confRestart Nginx
systemctl restart nginxLangkah 5 – Membuat database Moodle
Login ke MySQL dan buat database
mysql -uroot -pMasukkan pasword root MySQL, selanjutnya
Membuat nama dan user Database
CREATE DATABASE idnetter_moodle;
CREATE USER idnetter_moodle@localhost IDENTIFIED BY 'katasandi123';
GRANT ALL PRIVILEGES on idnetter_moodle.* TO idnetter_moodle@localhost;
FLUSH PRIVILEGES;
exit;
Langkah 6 – Install Git
Kita perlu Git untuk install/update Moodle, perintah untk install Git
apt install git -yLangkah 7 – Download Moodle
Masuk ke /var/www/html, Kemudian dengan Git, download Moodle
cd /var/www/html/
git clone git://git.moodle.org/moodle.git
masuk ke direktori moodle
cd moodleCek daftar versi Moodle
git branch -aTentukan versi Moodle yang akan diinstall, pada tutorial ini versi terbaru Moodle adalah 400 (LTS), Cek rilis di web Moodle
git branch --track MOODLE_400_STABLE origin/MOODLE_400_STABLE
Kemudian
git checkout MOODLE_400_STABLESetelah selesai, ganti permission direktori /var/www agar Moodle bisa read/write
chown -R www-data:www-data /var/wwwTuntas sudah, tinggal eksekusi Moodle melaui web browser.
Langkah 8 – Install Moodle
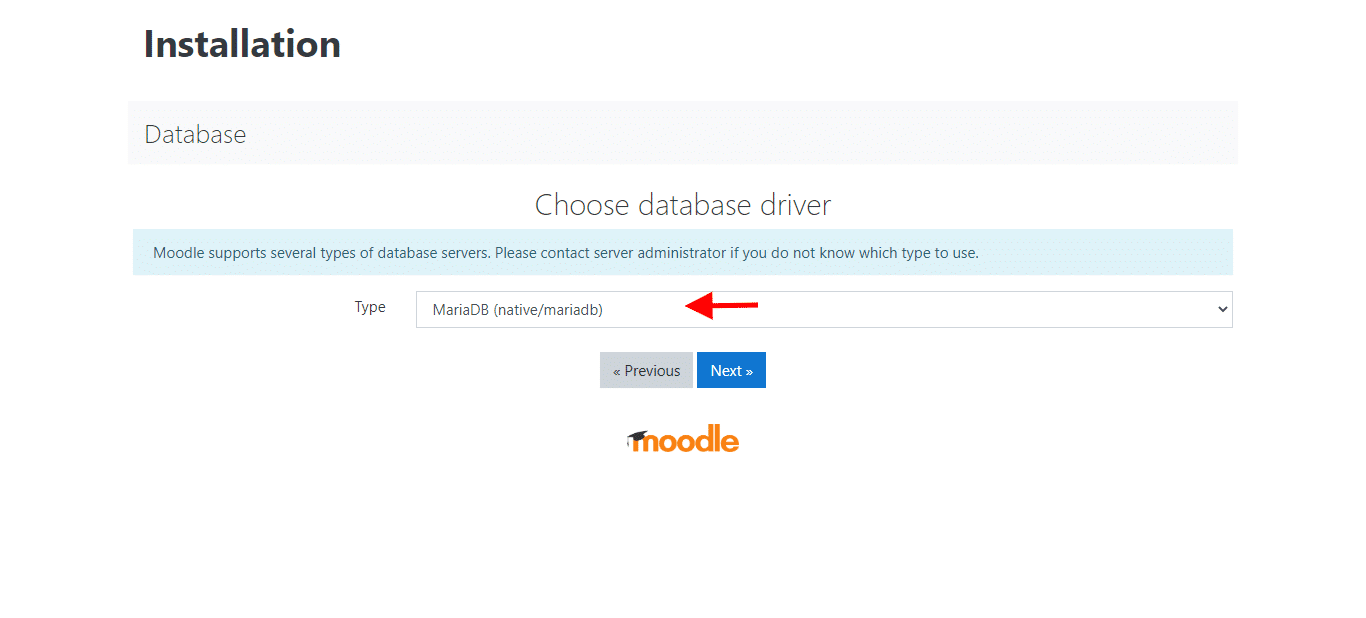
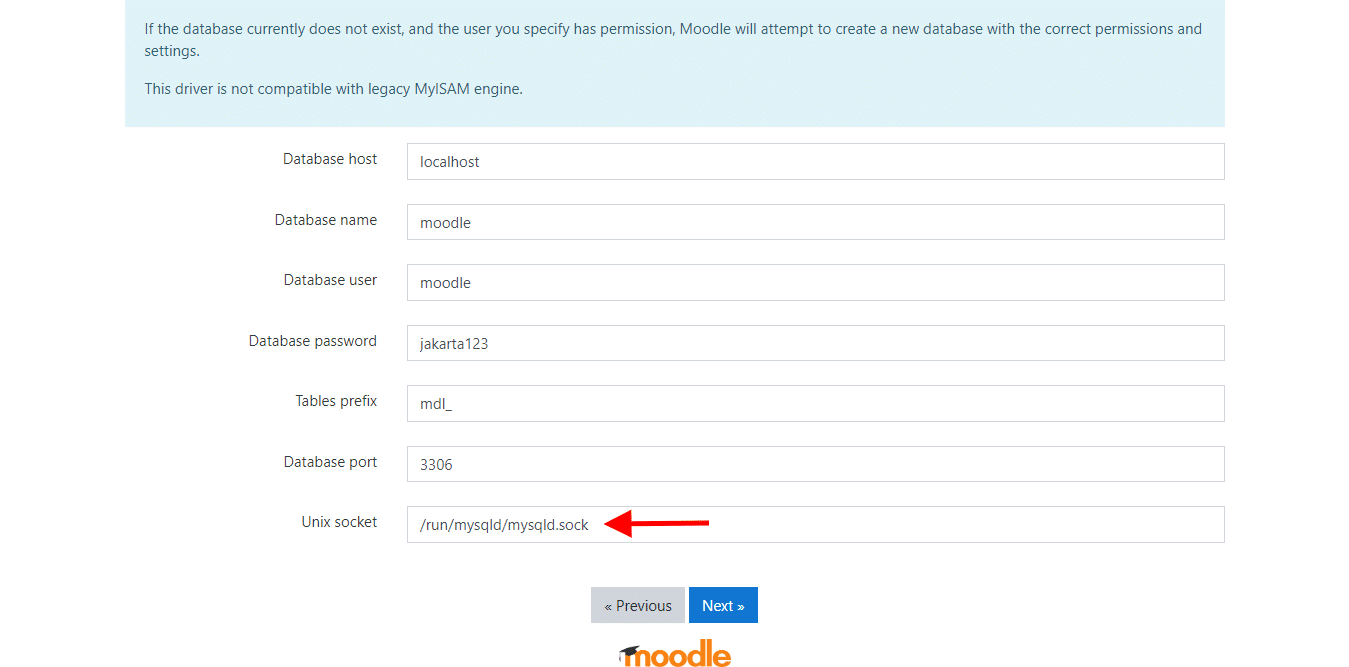
Install Moodle melalui web browser, silahkan akses IP server atau domain yang telah dikonfigurasikan. Oh iya saya sertakan gambar pada bagian yang saya pikir penting jika ada teman-teman yang bingung.
- Database Driver type:
MariaDB (native/mariadb) - Unix socket:
/run/mysqld/mysqld.sock
Nah, selesai teman-teman, semoga bermanfaat.
keren tutorialnya, waktu saya coba wellcone nginx sudah muncul, tapi waktu mau install moodle kok ada pesan error 403 forbiden, mohon pencerahannya
Coba cek error lognya di
/var/log/nginx/mungkin ownershipnya tidak sesuai, kalau defaultnya ubuntu dan instalasi direktorinya seperti di tutorial ini, coba jalankan perintah ini:chown -R www-data:www-data /var/wwwHalo kak,
mohon info kalo hanya diem pas cloning moodle dari Git musti diapain ya kak..?
Thanks,
jaringannya mungkin, coba lakukan ping ke git.moodle.org
jika gagal ping, coba cek /etc/resolv.conf ganti nameserver 1.1.1.1
403 Forbidden
nginx/1.18.0 (Ubuntu)
muncul itu bosku pdahal lngkahnya berhasil semua sy mnggunakan Ubuntu 20.04.3 LTS
chown -R www-data:www-data /var/www/html
Untuk URL rewrite Moodle di Nginx pakai ini:
rewrite ^/(.*\.php)(/)(.*)$ /$1?file=/$3 last;Atau dokumentasi terbaru bisa dicek di:
– https://docs.moodle.org/311/en/Nginx
– https://gist.github.com/jeffersonmartin/53802978e0728847854f741c3a17d6d8
:<3 Sudah diupdate